Showing posts with label snacks. Show all posts

Sunday, September 22, 2013

Chocolate Zucchini Bread

This chocolate zucchini bread is awesome for a few reasons: it tastes like cake, it’s actually pretty healthy (because it uses applesauce rather than oil), and it uses up 2 full cups of shredded zucchini.  Oh yeah, and it has chocolate chips in it!
I first made this when my neighbor handed me a zucchini the size of a baby’s arm.  I had run out of oil, so I was excited to come across a recipe that used applesauce instead of oil.  I’m not usually into calorie-cutting measures in my baked goods but I thought I’d give it a shot.  Healthy zucchini bread is better than no zucchini bread at all, right?
Chocolate Chip Zucchini Bread
I’m so glad I gave this recipe a chance.  It’s seriously delicious!  Tender and moist, tastes like cake (second time I’ve said that, I know), studded with chocolate chips, and with a hint of cinnamon.   I had to make it two times to use up my baby-arm zucchini, which is how we managed to take pictures of it to share with you!
Chocolate Zucchini Bread
Chocolate Chip Zucchini Bread
Have you noticed we’ve been bad bloggers? Sorry about that.  Remember Colorado Crafted?  It’s been keeping us very busy, but we’re not complaining!  Oh and remember those crazy floods that hit Colorado?  Yeah, those happened in our town.  We live in Longmont (the northern part of Boulder County) and so our city was hit pretty hard. 
Luckily Dulcie & I both live on a hill so our houses were safe.  People were evacuated literally blocks away from us, but we were both just fine.  So many things (our favorite bike trails along the river, the bridge we use to get everywhere, and so many local businesses) were destroyed, but we were very fortunate.  If you’re looking for a way to help out, go check out Colorado Crafted – we’re donating half of our proceeds to flood relief through the end of the month.  Send a box to someone who might need a boost, or remind someone about the best side of our state!Colorado flood relief
Now, on to the recipe!

Chocolate Zucchini Bread

  • 1 cup applesauce
  • 2 eggs
  • 3/4 cup sugar
  • 1 cup white flour
  • 1 cup wheat flour
  • 3 Tbsp unsweetened cocoa
  • 1 1/4 tsp baking soda
  • 1 tsp cinnamon
  • 1/4 tsp salt
  • 2 cups shredded zucchini
  • 1/2 cup chocolate chips
Preheat the oven to 350.
Combine applesauce, eggs, and sugar in a large mixing bowl.  Stir well to combine.
Dump in all the dry ingredients, then mix again.
Lastly, stir in the shredded zucchini and chocolate chips.  Pour into a greased 9x5 inch loaf pan and bake at 350 for 65-70 minutes.  Let cool for at least 10 minutes before removing from pan.
Chocolate Chip Zucchini Bread

Wednesday, May 29, 2013

Peanut Butter Banana Muffins

I created these muffins for a healthy (and preschooler friendly) snack the other day; I wanted them to be an alternative to banana bread.  My family loves banana bread; I love peanut butter toast with banana sliced on top.  These muffins are a happy hybrid of the two. They incorporate three whole bananas, a bunch of creamy peanut butter, and are made with half whole wheat flour. Yum!
peanut butter banana muffins 2
I threw in a handful of cacao nibs for some crunch.  The nibs are totally optional, and they didn’t add a ton of flavor.  You could even use crunchy peanut butter instead, if you want crunch but don’t have cacao nibs on hand.  Chocolate chips would be pretty great too. I bet if I’d added chocolate chips Dulcie would have been fighting me for the leftover muffins!
peanut butter & cacao nibs
These definitely walk the line between health food and a treat, which I’m a huge fan of in my muffin making. Like these muffins, for example. And as far as I can tell, all kids are big fans of both peanut butter and banana.  
peanut butter banana muffins

Peanut Butter Banana Muffins with Cacao Nibs

  • 3 ripe bananas, mashed
  • 1/2 cup brown sugar
  • 1/4 cup honey
  • 3/4 cup peanut butter
  • 2 eggs
  • 1/3 cup vegetable oil
  • 1 tsp vanilla extract
  • 1 cup flour
  • 1 cup whole wheat flour
  • 1 tsp baking soda
  • 1/2 tsp salt
  • 1/2 cup cacao nibs
Preheat oven to 400 F.
Combine the bananas, sugar, honey, peanut butter, eggs, vegetable oil and vanilla extract in a food processor and process until smooth.  You could also use a mixer or a wooden spoon plus a strong arm; I’ve just gotten in the habit of combining all the wet ingredients for muffins using the food processor.  It makes quick work of the bananas!
Combine the flours, baking soda, salt, and cacao nibs in a large bowl.  Pour the wet mixture over the dry and stir to combine.
Spoon into a prepared muffin tin (I used papers), then bake at 400 for 16-18 minutes.
          peanut butter banana muffins sq

          Monday, September 24, 2012

          Pumpkin Cream Cheese Muffins

          Pumpkin muffins loaded with warm autumn spices and a delicious cream cheese center.  The epitome of fall! The type of recipe you make yourself and realize tastes much better than the coffee shop version! Behold:

          Pumpkin Cream Cheese Muffin

          This is another of those classic autumn recipes that we have seen making the rounds on Pinterest, so we pounced on the very first cool weather day to make these beauties.  We found lots of very similar versions of this recipe online (Annie’s Eats and See Brooke Cook to name two).  Let me tell you about how we’ve simplified them, just for discussion’s sake.

          First of all, most recipes call for you to form the sweetened cream cheese into a log, wrap it in plastic, freeze it, then slice off medallions to plop into the center of the muffins.  The honest reason we didn’t do this is because we were too far along when we actually read this part of the recipe.  Oops, totally my fault.  I am the non-meticulous one.  We were so sad, thinking that our muffins would be a mess when they came out of the oven.  But they weren’t – the filling didn’t melt away and it all turned out quite beautifully. Whew!

          DIY Pumpkin Cream Cheese Muffin

          Next, most recipes called for the inclusion of both “pumpkin pie spice” as well as most of the individual components of pumpkin pie spice. We found this confusing and also we don’t keep pumpkin pie spice on hand, so we broke the spice mixture down into its basic parts (cinnamon, ginger, nutmeg, and clove).  This is nice and flexible – feel free to ad lib here; it will be OK if you leave a few out as long as you keep the cinnamon.

          The other thing we did was reduce the sugar and oil in this recipe.  Now – you know us, and it wasn’t for health reasons but instead for taste reasons.  Many comments on the original recipes said the muffins were overly oily, so we reduced it a smidge. Then we started thinking that 1/2 cup sugar combined with 4 oz cream cheese would result in an uber-sweet filling, so we chopped the sugar amount in half. Last but not least, 1 cup of sugar in a recipe for 12 muffins seemed like a lot, so we reduced that to 3/4 cup and were very happy with the results.

          Pumpkin Cream Cheese Muffin

          Pumpkin Cream Cheese Muffins

          Yield 12 muffins
          Cream Cheese Filling
          • 4 oz cream cheese
          • 1/4 cup sugar
          Whip together cream cheese and sugar very well.  We’ve done this with a fork, a hand mixer, and a food processor – anything works.  When it is all combined, pop it back in the fridge to stay cold while you prep the rest of the muffins.  Having this mixture as cool as possible will prevent the cream from melting away too much during baking.  The results in the picture were created with the cream mixture left at room temperature, though, so don’t worry too much about this cooling step!
          Muffins
          • 3/4 cup sugar
          • 1/2 cup vegetable oil
          • 1 cup pumpkin puree
          • 2 eggs
          • 1 3/4 cup flour
          • 1/2 tsp baking soda
          Our own version of “Pumpkin Pie Spices”; feel free to ad lib a little based on what you have on hand.  Nothing is essential other than the cinnamon.
          • 1 1/2 tsp cinnamon
          • 1/2 tsp ginger
          • 1/2 tsp nutmeg
          • 1/4 tsp cloves
          Mix the sugar, oil, pumpkin, and eggs together very well in a large mixing bowl.  Then plop the flour, baking soda, and pumpkin pie spices on top of this blended wet mixture.  Stir well to incorporate and fully mix everything together. 
          Line muffin tins with paper cups, or lightly oil them. Spoon about 1-2 Tablespoons of batter into the bottom of each muffin.  We used a regular dinner spoon – heaping – to do this.  Make sure this batter is spread thinly and evenly across the bottom of each muffin tin.  I whacked mine flat on the counter a few times to accomplish this.
          Next, distribute a spoonful (approx 1 Tablespoon) of the cream cheese filling in each.
          Finally, evenly distribute the remainder of the batter over the top of the cream cheese.  Approx 2-3 Tablespoons each is what we came out with.
          Bake at 350 for 20-25 minutes.  Let cool before you eat them, unless you are ready to deal with molten cream cheese!


          Pumpkin Cream Cheese Muffin

          Pumpkin Cream Cheese Muffins

          Pumpkin muffins loaded with warm autumn spices and a delicious cream cheese center.  The epitome of fall! The type of recipe you make yourself and realize tastes much better than the coffee shop version! Behold:

          Pumpkin Muffins filled with cream cheese

          This is another of those classic autumn recipes that we have seen making the rounds on Pinterest, so we pounced on the very first cool weather day to make these beauties.  We found lots of very similar versions of this recipe online (Annie’s Eats and See Brooke Cook to name two).  Let me tell you about how we’ve simplified them, just for discussion’s sake.

          First of all, most recipes call for you to form the sweetened cream cheese into a log, wrap it in plastic, freeze it, then slice off medallions to plop into the center of the muffins.  The honest reason we didn’t do this is because we were too far along when we actually read this part of the recipe.  Oops, totally my fault.  I am the non-meticulous one.  We were so sad, thinking that our muffins would be a mess when they came out of the oven.  But they weren’t – the filling didn’t melt away and it all turned out quite beautifully. Whew!

          process of construction pumpkin cream cheese muffins

          Next, most recipes called for the inclusion of both “pumpkin pie spice” as well as most of the individual components of pumpkin pie spice. We found this confusing and also we don’t keep pumpkin pie spice on hand, so we broke the spice mixture down into its basic parts (cinnamon, ginger, nutmeg, and clove).  This is nice and flexible – feel free to ad lib here; it will be OK if you leave a few out as long as you keep the cinnamon.

          The other thing we did was reduce the sugar and oil in this recipe.  Now – you know us, and it wasn’t for health reasons but instead for taste reasons.  Many comments on the original recipes said the muffins were overly oily, so we reduced it a smidge. Then we started thinking that 1/2 cup sugar combined with 4 oz cream cheese would result in an uber-sweet filling, so we chopped the sugar amount in half. Last but not least, 1 cup of sugar in a recipe for 12 muffins seemed like a lot, so we reduced that to 3/4 cup and were very happy with the results.

          Pumpkin Cream Cheese Muffins with cheese peeping out

          Pumpkin Cream Cheese Muffins

          Yield 12 muffins

          Cream Cheese Filling

          • 4 oz cream cheese
          • 1/4 cup sugar

          Whip together cream cheese and sugar very well.  We’ve done this with a fork, a hand mixer, and a food processor – anything works.  When it is all combined, pop it back in the fridge to stay cold while you prep the rest of the muffins.  Having this mixture as cool as possible will prevent the cream from melting away too much during baking.  The results in the picture were created with the cream mixture left at room temperature, though, so don’t worry too much about this cooling step!

          Muffins

          • 3/4 cup sugar
          • 1/2 cup vegetable oil
          • 1 cup pumpkin puree
          • 2 eggs
          • 1 3/4 cup flour
          • 1/2 tsp baking soda

          Our own version of “Pumpkin Pie Spices”; feel free to ad lib a little based on what you have on hand.  Nothing is essential other than the cinnamon.

          • 1 1/2 tsp cinnamon
          • 1/2 tsp ginger
          • 1/2 tsp nutmeg
          • 1/4 tsp cloves

          Mix the sugar, oil, pumpkin, and eggs together very well in a large mixing bowl.  Then plop the flour, baking soda, and pumpkin pie spices on top of this blended wet mixture.  Stir well to incorporate and fully mix everything together. 

          Line muffin tins with paper cups, or lightly oil them. Spoon about 1-2 Tablespoons of batter into the bottom of each muffin.  We used a regular dinner spoon – heaping – to do this.  Make sure this batter is spread thinly and evenly across the bottom of each muffin tin.  I whacked mine flat on the counter a few times to accomplish this.

          Next, distribute a spoonful (approx 1 Tablespoon) of the cream cheese filling in each.

          Finally, evenly distribute the remainder of the batter over the top of the cream cheese.  Approx 2-3 Tablespoons each is what we came out with.

          Bake at 350 for 20-25 minutes.  Let cool before you eat them, unless you are ready to deal with molten cream cheese!

          pumpkin cream cheese muffins

          Monday, June 4, 2012

          Popsicles with Roasted Strawberry & Coconut Milk

          In search of something creamy and cool, with a seasonal fruit thrown in the mix, we came up with these popsicles.  With only three ingredients – coconut milk, roasted strawberries, and a spoonful of agave for sweetness - these are simple to make and easy to substitute in any seasonal fruit you’ve got on hand.  Not bad in terms of a reasonably healthy treat that makes toddlers literally squeal (loudly) with excitement!

          roasted strawberry & coconut popsicles sq

          We decided to see what would happen if we attempted to concentrate fresh strawberry flavors from fresh and light to rich and intense.  We love fresh strawberries, but their flavor sometimes seems too muted when you start using them as an ingredient (rather than eating them straight out of hand).  We did it simply by roasting the strawberries for 20 minutes. Sprinkled with a tablespoon of sugar, they develop bubbly brown edges and deep flavors.  Perfect for blending with coconut milk to create a creamy popsicle with lots of strawberry flavor.

          roasted strawberry & coconut popsicles 3

          To be honest, these popsicles came together as a result of leftovers. I had some coconut milk waiting in the fridge, and I was itching to use it in a summery dessert. We had leftover roasted strawberries from our latest cocktail over at our Whole Foods column, Locally Mixed.  A little agave for sweetness (chosen for its easy-to-stir-in consistency) and we had ourselves four sweet little popsicles! 

          roasted strawberry & coconut popsicles 2

          Popsicles with Roasted Strawberries & Coconut Milk

          • 1/2 c. coconut milk
          • 1/2 c. roasted strawberry puree (recipe below)
          • 1 Tbsp. agave

          Blend all three ingredients together, pour into popsicles molds, and freeze overnight.  Warning:  This recipe only makes about 4 small popsicles; feel free to double it!


          Roasted Strawberry Puree

          • 2 cups roughly chopped strawberries
          • Sprinkled with 1 Tbsp sugar

          Yield: 1 cup

          Roast at 400 for approx 20 minutes or until edges are browning and the pan contains bubbling & caramelizing strawberry juice.  I highly recommend a rimmed baking sheet for this recipe!  Scoop roasted strawberries into a glass jar for storage and mash them with a fork until they fall apart into a rough “puree”.

          If you’re looking for another excuse to make a batch of the Roasted Strawberry Puree, here’s one:  Roasted Strawberry, Gin, & Ginger Cocktail!

          roasted strawberry & coconut popsicles

          Monday, April 16, 2012

          Homemade Hummus

          Homemade hummus is another one of those recipes that is so easy to make super fresh at home.  I’ve made a lot of hummus over the years, and in my research I learned a trick to making really creamy (as opposed to “grainy bean mash”) hummus. Yes, we have a trick to share with you! It’s easy.

          Homemade Hummus

          The secret to creamy hummus is the order in which you combine the ingredients. You start with the tahini, lemon juice, and water. Whir these together like crazy to create a totally smooth and creamy emulsion – it should look like thick cream. THEN you add the chickpeas and garlic and blend until smooth. The chemistry of whatever happens here creates the end result of creamy hummus rather than grainy bean mash. If you’re interested, drop in on some nice vegetarians ranting and raving about this over here.

          Tahini & Lemons

          You can catch a glimpse of the tahini emulsion in the upper right picture, below.

          Making Hummus

          Top your creamy fresh hummus with chopped parsley, drizzle with olive oil, and serve.  We (and our toddlers!) love this with carrots, pea pods, pita bread triangles, cabbage wedges, and loads of harissa.  Well…not the toddlers on that last one.

          Homemade Hummus

          Homemade Creamy Hummus

          • 1/4 cup tahini
          • 1/4 cup fresh lemon juice
          • 2 Tbsp water
          • 4 small cloves of raw garlic (the raw garlic adds a spicy kick so adjust according to your tastes!)
          • 16 oz can chickpeas, drained
          • 1/2 tsp salt
          Put tahini, lemon juice, and water in the food processor. Blend (and scrape down if any tahini sticks) until it forms a thick creamy emulsion.
          Blend garlic and salt into the tahini cream.
          Add the chickpeas and blend until your hummus is totally smooth and creamy. Note that this recipe calls for fewer chickpeas (in proportion to the other ingredients) than many other recipes – it is more tahini and lemon heavy, which helps achieve that delicious texture!
          Homemade Hummus

          Sunday, March 18, 2012

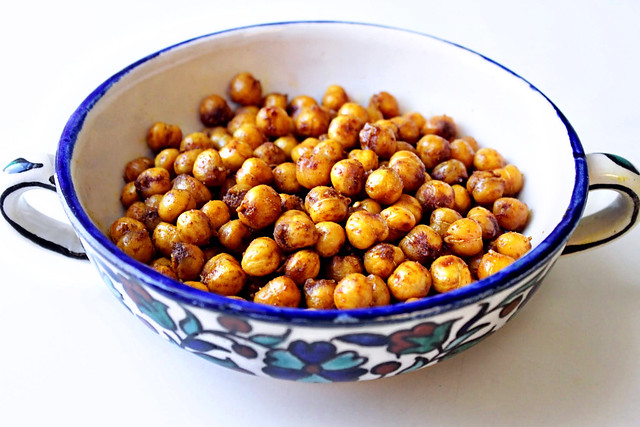
          Moroccan-Spiced Roasted Chickpeas

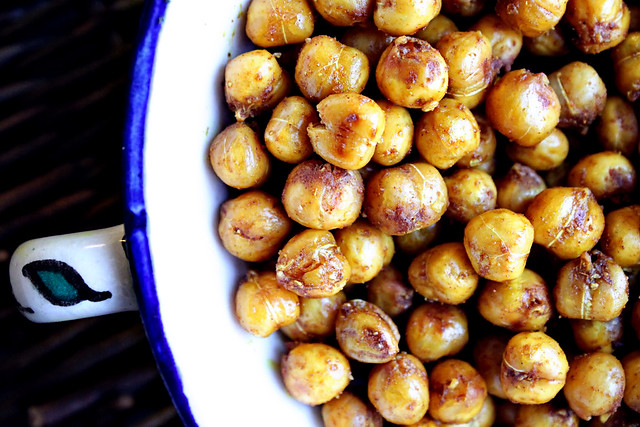
          We're always on the look out for quick and healthy snacks, and this recipe fits the bill. As a surprising bonus, our toddlers gobbled these crispy little chickpeas down.
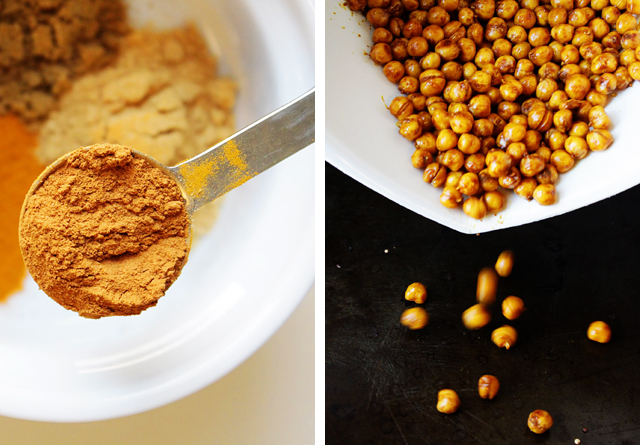
          This is another recipe inspired by Super Natural Everyday, but not wanting to mess around with several paprikas among other flavorings, we looked to Morocco's cuisine for big flavor in only a few spices. Ginger, cinnamon, and cumin provide complex flavor in this snack that disappeared all too quickly after it came out of the oven.
          Moroccan-Spiced Roasted Chickpeas
          • 2 15-oz cans chickpeas, rinsed and dried
          • 1/4 cup olive oil
          • 2 tsp cinnamon
          • 2 tsp ginger
          • 2 tsp cumin
          • 1 tsp sea salt
          1. Preheat the oven to 425 F with a rack in the top third of the oven. Pour the chickpeas on a rimmed baking sheet and roast for 10 minutes. Shake the pan and roast for another 8 to 10 minutes. (Keep an eye on your chickpeas to avoid burning.)
          2. Transfer the roasted chickpeas to a large bowl and mix together with olive oil, spices, and sea salt until well coated. Return to the baking sheet and roast for another 3 to 5 minutes. 

          Tuesday, September 6, 2011

          Honey and Hazelnut Spread

          This delicious confection is a simple alternative to the popular breakfast spread Nutella. While I love hazelnut and chocolate as much as anyone else, I feel a little funny putting chocolate on my toast first thing in the morning. This confit de miel et noisettes only uses two ingredients: toasted hazelnuts and honey, and it is rich and delectable. It is quite sweet, but it isn't like spreading your toast with frosting.
          The smell of hazelnuts toasting in the oven reminds me of fall which can't get here fast enough. (Sweater weather, here I come!) We paired our honey and hazelnut spread with crisp apple slices and croissants.
          This is another recipe from the fabulous French Farmhouse Cookbook. Every time I pick this cookbook up I find another recipe that I'm dying to try. It is definitely the least intimidating (yet authentic) French cookbook that I've found.
          Honey and Hazelnut Spread
          • 1 cup hazelnuts
          • 1/2 cup honey
          Preheat the oven to 350F. Spread the hazelnuts on a baking sheet and toast them in the oven until they are deep golden, 10 to 12 minutes. Remove them from the oven and immediately place the hazelnuts into a tea towel. Rub vigorously to remove the skins. You probably won't get them all off, but get off as much as you can, because they are bitter. Puree the hazelnuts in a food processor until smooth and a little oily. Add the honey and pulse until combined. The spread will keep in an airtight jar in the fridge indefinitely.

          Friday, March 11, 2011

          Whole Wheat & Cheddar Crackers

          Dulcie and I each have an under-two toddler.  If you don’t have a toddler of your own you might not realize this, but OMG THEY LOVE CRACKERS.
          These are the homemade healthy version of little cheesy crackers.  They are made with 100% whole wheat, sharp cheddar, a little butter, and not much else.  Their texture is pretty amazing if I do say so myself: crispy, crunchy, and flaky.  They’re rich and buttery from all the cheese. 
          Crackers made with whole wheat & cheddar
          We’ve been buying plenty of Annie’s bunnies and crackers of that ilk.  They have a fairly natural/healthy ingredient list but they only come in bunny shapes.  If you make them at home you can do any shape you want.  You know, like stars and little ducks and kitties.  Deb over at Smitten Kitchen, who was this inspiration for this recipe, did little goldfish.
          Also, the real reason I am excited about these crackers is that deep down (OK maybe not that deep down) I am a cheapskate.  Making these crackers warmed the cockles of my cheap little heart. 
          whole wheat & cheddar cheese crackers
          Today I brought these as a snack to this gigantic weekly play group thing (think 50 kids under 4 running around like crazy people in a huge gymnasium full of toys).  Every time I got out the bag I was instantly surrounded by random children saying in plaintive little voices: More? More? More? 
          Crackers and little kids, man.  I don’t get it!
          homemade whole wheat crackers for toddlers
          I do have some words of advice when you make these.  The main thing is to make sure you use a fairly hard oily cheddar cheese that you like the taste of.  If the cheese is too soft, the crackers won’t have the right crispy texture.  And if you don’t like the taste of the cheese very much, you won’t like the crackers because the cheese flavor is very prominent.
          healthy homemade crackers for kids
          OK?  Ready?  Here’s the recipe:
          :: :: :: :: ::
          Whole Wheat & Cheddar Crackers
          • 12 oz grated sharp cheddar (make sure you like how it tastes!)
          • 8 Tablespoons butter
          • 1 1/2 cups whole wheat flour
          • 1/4 teaspoon onion powder
          • 1/4 teaspoon salt
          Preheat oven to 350.  Dump all the ingredients in your food processor and run for 1-2 minutes or until everything forms a big dough ball.  EASY!!!
          Pull out the dough ball, wrap it in plastic, and let it sit in the fridge for 30 minutes to cool off.  This will make it much easier to roll out.
          Roll the dough out to about 1/8” thick on a floured surface (I also sprinkled flour on the top side of the dough to prevent it from sticking to the rolling pin).  Cut out shapes with 1-2” cookie cutters and transfer to a parchment lined baking sheet.  If you don’t want to bother with cutting out shapes you can just get out a pizza cutter and cut the dough into small 1.5” squares – this is what I plan to do next time.
          Bake for 12-15 minutes or until golden brown around the edges. 
          healthy homemade crackers for kids
          Thanks again to Smitten Kitchen for this recipe inspiration!
          Related Posts Plugin for WordPress, Blogger...